
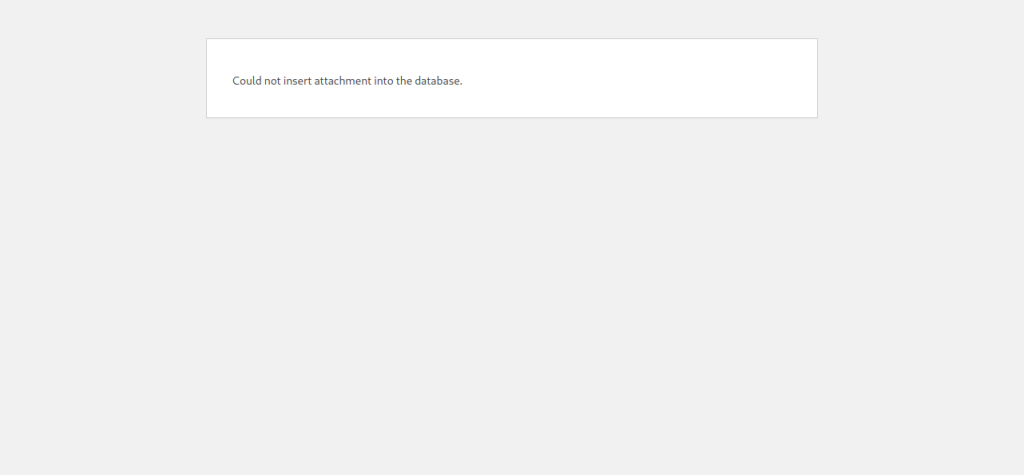
WordPress Could Not Insert Attachment Into The Database: How To Fix It
If you’re running a WordPress website, you may encounter the “WordPress could not insert attachment into the database” error when trying to upload an image or other media file to your site. This error can be frustrating and confusing, especially if you’re not familiar with the technical details of how WordPress works. However, with a few simple steps, you can often fix the issue and get your media files uploaded successfully.

What Causes The “WordPress Could Not Insert Attachment Into The Database” Error?
Before we get into how to fix the error, it’s important to understand what’s causing it. Typically, this error occurs when WordPress is unable to save the uploaded media file to the database. This can happen for a variety of reasons, including:
- Lack of disk space – If your website’s hosting account is running low on disk space, you may not be able to upload new media files. Check with your hosting provider to see if you’re close to your storage limit.
- Database issues – Your website’s database may have become corrupted or reached its size limit, preventing new data from being saved. This can happen if you’re running an older version of WordPress, or if your site has a large number of posts and media files.
- Plugin conflicts – If you have recently installed or updated a WordPress plugin, it could be causing a conflict that’s preventing media files from being uploaded. Try disabling any recently-installed plugins and see if that resolves the issue.
- File permissions – Incorrect file permissions can prevent WordPress from saving media files to your server. Make sure that the folders where WordPress stores media files have the correct permissions set.
How To Fix The “WordPress Could Not Insert Attachment Into The Database” Error
Now that you know what could be causing the error, let’s look at some steps you can take to fix it.
Step 1: Check Disk Space
The first thing to do is to check how much disk space you have left on your hosting account. If you’re running low on disk space, you’ll need to either delete some old files or upgrade your hosting plan to get more storage. Contact your hosting provider for more information on how to do this.
Step 2: Repair Your Database
If you’ve ruled out disk space as the issue, the next step is to repair your website’s database. You can do this using a plugin such as WP-DBManager, which can help you optimize and repair your database. Once you’ve installed the plugin, go to the “Database” section and click “Repair DB.” This will scan your database for any errors and fix them automatically.
Step 3: Disable Plugins
If repairing your database doesn’t work, the next step is to disable any recently-installed plugins to see if they’re causing the issue. To do this, go to your WordPress dashboard and click “Plugins.” Deactivate any plugins that you recently installed or updated, and then try uploading your media file again. If the error disappears, you know that one of the plugins was causing the issue. You can then try reactivating them one by one to see which one is causing the conflict.
Step 4: Check File Permissions
Finally, check the file permissions on the folders where WordPress stores media files. You can do this using an FTP client or a file manager tool in your hosting control panel. Make sure that the folders have the correct permissions set – typically, this will be 755 for directories and 644 for files. If the permissions are incorrect, you can change them using your FTP client or file manager tool.
This happens when you try to upload any media from your WordPress admin dashboard under add new media.
Solution: How to resolve “Could not insert attachment into the database” WordPress error
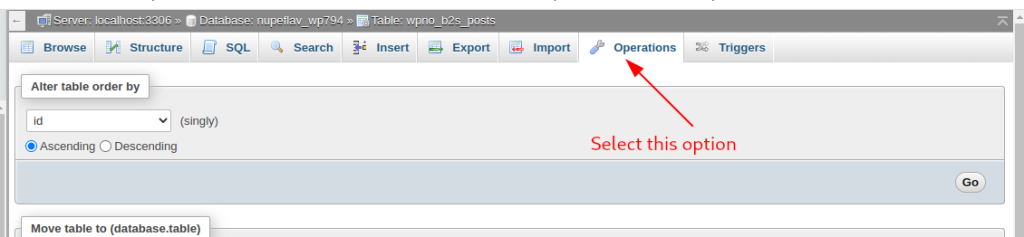
- Access PHPmyadmin and click on the database of the domain showing the error.
- Access the posts table
- Click the Operations tab at the top
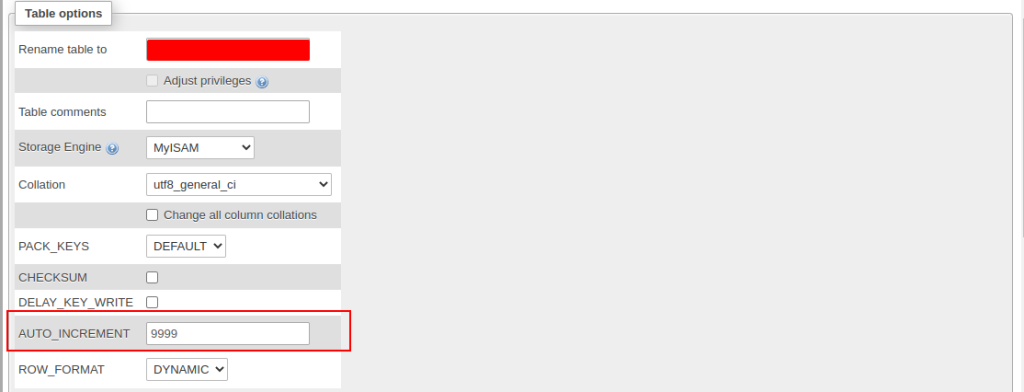
4. In the Table options section set AUTO_INCREMENT to 9999 and click Go button to apply the changes.
5. Back to your Cpanel, search for MYSQLDATABASE

6. Select your database under the Check Database option and click on Check Database button to check for the database health.
7. After the check, go back to the “Modify Database page” , select your database under Repair Database row and click on Repair Database. This repairs your database in case of any errors.
This should resolve the error.
Other checks Quick checks.
- Check if your WordPress folders have the right permissions. Folders to pay attention to are wp-content, inside it is the uploads folder and all folders inside have the permission 0755
- Check if your disk has space to accommodate the new media files.
Conclusion:
The “WordPress could not insert attachment into the database” error can be a frustrating problem for website owners, but with the steps outlined above, you should be able to identify and fix the issue. Remember to check your disk space, repair your database, disable any conflicting plugins, and check file permissions. By following these steps, you can get your media files uploaded successfully and ensure that your website is functioning properly.
It’s important to keep your website updated and well-maintained to prevent issues like this from occurring in the future. Regularly check for updates to WordPress, themes, and plugins, and keep your website’s database optimized and cleaned up. With a little bit of maintenance and troubleshooting, you can keep your WordPress website running smoothly and free of errors.
How To Create a WordPress Website For Beginners


![How to Duplicate a Page in WordPress [The Easy Way]](https://describewp.com/wp-content/uploads/2023/06/How-to-Duplicate-a-Page-in-WordPress-300x200.jpg)